Steps
- 01 Enter your email and click Create Account
- 02 Check your email inbox to retrieve code
- Demo To see demo you can use demo@poncesolutions.com
The email will never be sold or used for anything that is not related to your ticket creation.
If you need to just to look around the ticket/invitation insert process, use demo@poncesolutions.com email and EMP634 as the code.
If you have used our application before, enter your email and click Create Account. On the next step you can use your initial code.
If you need to just to look around the ticket/invitation insert process, use demo@poncesolutions.com email and EMP634 as the code.
If you have used our application before, enter your email and click Create Account. On the next step you can use your initial code.
We use cookies to track the ticket creation process.
For the moment, it is free. Also, the print works well in Chrome browser. Other browsers have not been fully tested.
- 01 Enter Code and click Validate Code
- Demo EMP634 is the code for demo
If you know the code that has been sent before, you can enter that code again.
- 01 Select Orientation. At this time there is only one option. More are in the works.
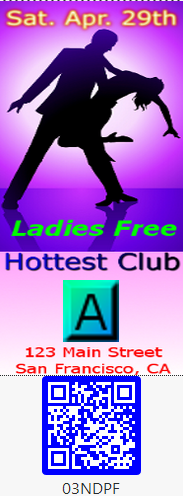
- A Using an image(379px in height X 188px in width). The QR code will be at the bottom
The current template prints 8 tickets on a portrait letter type page.
In the future it is possible that there will be additional types of inserts.
This orientation has been created based on the presentation.
In the future it is possible that there will be additional types of inserts.
This orientation has been created based on the presentation.
Most of the information that is needed for the RSVP insert is static. It has been decided o use an image because it can be customized to your needs with images and text as well as the colors.
Soon we will include a text based template.
Soon we will include a text based template.

ABC123
Name of the guest
- 01 Load an image 379px in height and 188px in width(ratio is important). If the image does not have the correct proportion it may not look as you expect
- 02 Select the color for the QR. Remember to test your QR later on to make sure that it is scannable
- 03 Update the url to which the users will be directed to RSVP. The url will look like https://www.poncesolutions.com/demo/index.php?id=ABC123
- 04 Click on the step 5 once you have uploaded your image and updated the url.
The current template prints 8 tickets on a portrait letter type page.
The image and QR on this step are for information purpose only. The QR may not be scannable here. Once you preview your print out on the next step, the QR should be scannable.
The image and QR on this step are for information purpose only. The QR may not be scannable here. Once you preview your print out on the next step, the QR should be scannable.
QR Code Generation
- 01 Select a CSV file to load your guest list. Having a list is convenient to identify each insert when adding them to your invitation
- 02 Or Enter the number of QR codes you want to generate
A CSV file is a text file that has each field separated by comma(,). The first row must contain the field name as specified in the example.
If you load a file, the number of QR Codes will be derived by the number of guests in the file.
You can have a file with the name and the number of guests in the party. The Table Assigned field is optional.
To print the invitation insert only steps 1 thru 5 are needed. Step 6 is used to configure your order if you decide to use the free Online RSVP option.
Name,Number of Guests,Table
Abraham Mcdaniel,5,24
Adrienne Mccarthy,5,8
Alicia Terra,5,2
Alison Mccoy,2,6
If you load a file, the number of QR Codes will be derived by the number of guests in the file.
You can have a file with the name and the number of guests in the party. The Table Assigned field is optional.
To print the invitation insert only steps 1 thru 5 are needed. Step 6 is used to configure your order if you decide to use the free Online RSVP option.
- 01 Update the necessary options.
- 02 Once your options are set, click Update Configuration
The options that you set here will be used on the page where your guests can RSVP.
For example, if your option shows No on Allow guest count increase, when the guest tries to RSVP, he/she will no be able to increase the guest count on their invitation.
In step 5 you could load a file with your guest name and table that has been assigned. As coordinator, you will be able to update the table assignment online.
